
3rd Floor Design Plan
Come see the finished product!
Come see the finished product!
Our next project is upon us and to say we are excited is an understatement! This is the first project in our home that is outside of our primary living areas. Is it really possible to complete a project that doesn’t disrupt your entire life?!
Most of our excitement is because the 3rd Floor is all bonus space - we can create all of those little spaces that we are currently missing - and we are taking the opportunity to break from the Victorian aesthetic and explore something new.

Our Victorian home has three floors. You are likely familiar with the 1st and 2nd Floors but the 3rd Floor is rarely seen. Over the past 7 years this space has been used for just about everything - storage - office space - sleepovers - you name it.
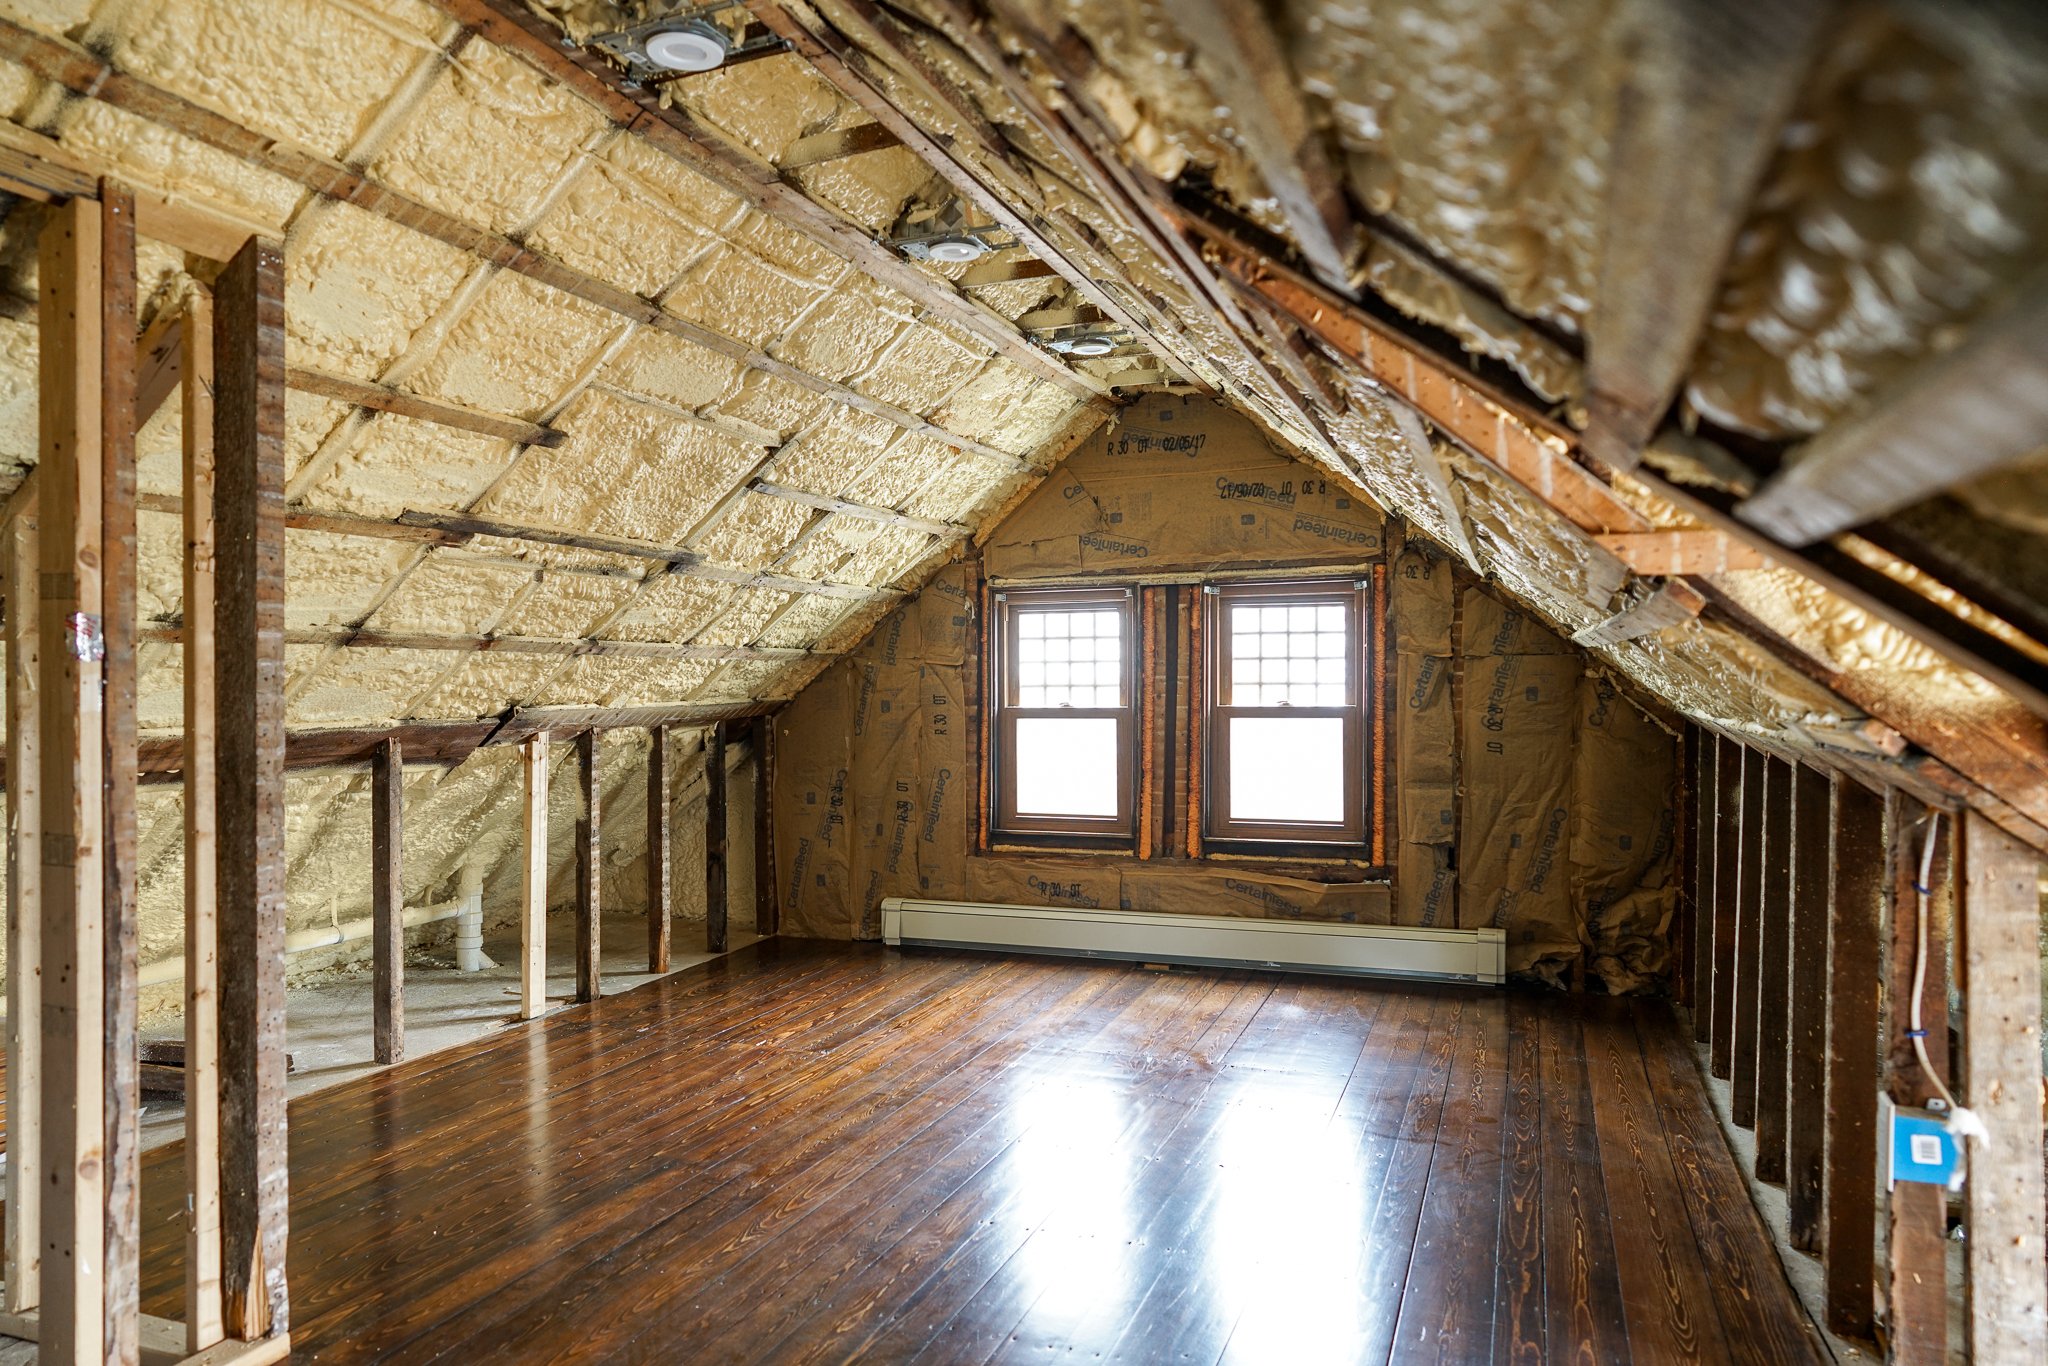
Existing Conditions
When we purchased our home it was completely gutted (down to the studs) and we had a three month sprint before walls were to be installed and plastered. This meant that we had to think of EVERYTHING in a very short period of time. Needless to say it was quite anxiety provoking.
This is the list of things that we did (and didn’t do) in the 3rd Floor:
The plaster ended on the 3rd Floor landing but the remainder of the space would remain without walls.
We insulated the ceiling with closed cell insulation and the end walls with standard pink insulation.
We ran all of the HVAC duct work because the second floor walls and ceiling were open. We also ran dedicated electric, thermostat wires, and line sets (copper pipe) to the basement. We cut cost by not purchasing any of the HVAC equipment and have been using window units since.
We sanded and refinished the floors because we were doing the entire house and the additional cost was nominal.
We ran electric to the recessed cans and walls.
We had the ornate window replicated because it was missing and the opening was boarded up.
Now the space has sat, cozy warm in the winter, and fairly cool in the summer waiting for this moment.
Design Inspiration
At the end of a busy day we would sometimes sit down and talk about what the 3rd Floor should look like. The project always seemed light years away and we often dreamed about doing something new - not at all Victorian. Regardless of the specific style we knew we wanted it to be clean, bright, and not fussy.
In the end we thought it would be fun to create it nordic inspired space. We took a winter trip to Iceland for inspiration and it sealed the deal.

Inspiration - Corpo Santo 6 by Samuel Torres de Carvalho Arquitetura // More inspiration on our 3rd Floor Pinterest Board
The Design Plan
When we announced our next project we had so many great suggestions - ranging from a home office to a full built in library. We are actually surprised with the number of library suggestion (especially because we have a parlor) - but overall you folks are quite creative.
One thing we wanted to make sure of is that our design wouldn’t limit future use. We knew how we want to use the 3rd Floor but that very well may change - we want the space to remain as flexible as possible. Sorry folks, no built-in desks or bookshelves here!
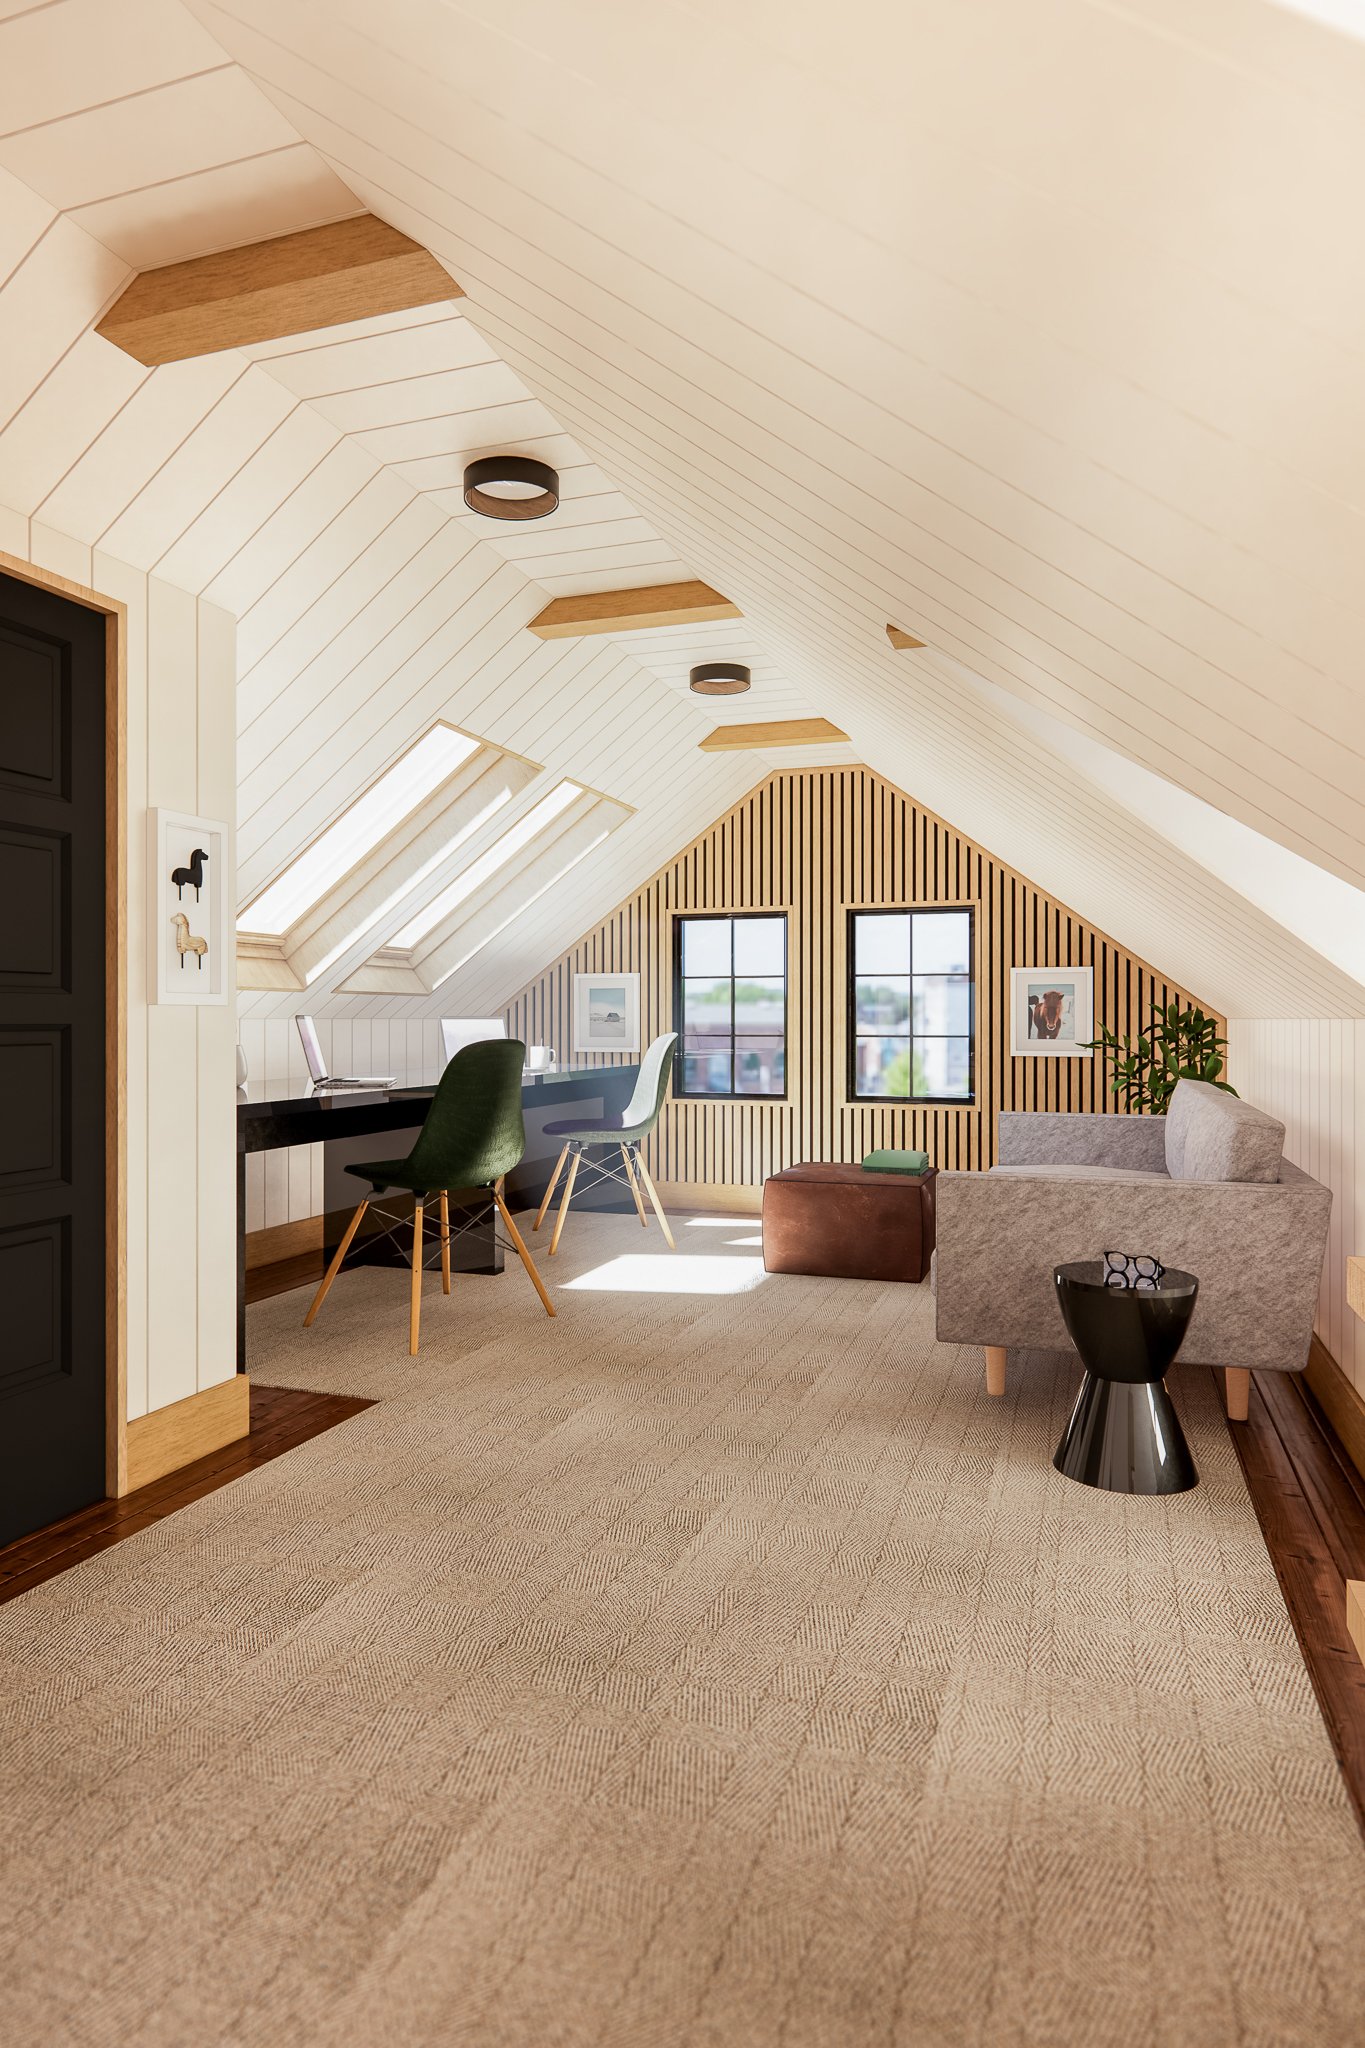
Rendering - The Office View
// Usage: We have four primary needs in this space:
We need an Office: While we have a small desk in the Princess Room it’s too small for us to work together (and collaborate) and it takes up a lot of space in an otherwise small guest room. During this design process, as an example, we are camped out at our Dining Room table - massive external monitors and all.
Lounge Space: We do have a Living Room where we probably spend most of our time. While it’s perfect for catching up on tv shows at the end of the day we really want something cozier. We are talking a massive couch for movie nights with friends… or that new Playstation David is threatening to buy at the end of this project.
Permanent home for the Peloton: Yes, we are embarrassed for this one… Yes, we bought a Peloton when stuck at home. This thing is continuously rolled between the Princess Room and Cowboy Rooms depending on what we are doing - none of which includes actually using it (we are on and off about our usage).
Extra Sleeping Space: While the 3rd Floor is not a legal bedroom we do use it a few times a year for sleeping overflow. We want to think about ways to incorporate sleeping areas without it taking up valuable real estate.

Rendering - The Window Reading Nook View
// Process: For us, the first step to any design plan is capturing existing conditions. Stephen has an incredible ability to create visualizations and we take full advantage. After measuring every single possible distance and angle, Stephen tediously enters them into Sketchup - building the foundation for our design plan and renderings.
Once the walls and details are modeled out to scale we can begin the fun part - importing finishes and furniture to help visualize how the space will look. Sketchup has an amazing inventory of real life items, and some companies even provide product files on their website.
Materials
// Walls: The most debated element was the wall coverings (we are still talking about it everyday). Would it be best to plaster? Sheetrock and add a finish product on top? Skip the sheetrock and go right for tongue and groove? Could we use engineer flooring? Hardwood flooring? Shiplap (kidding, that was never an option)? MDF that we customize? Honestly, we are still unsure.

Rendering - The Movie & Lounge Area View
// Floors: While our floors are finished - and quite pretty - they are dark and far from nordic inspired. We decided that they would still work if we were smart about a rug or carpet solution. We have rugs throughout our home and really love how they warm up the floor and create a cozy space, moreover they help with noise.
The funny thing about the 3rd Floor is that the floor plan is irregular and no standard sizes fit well. We are going to need a custom solution and think we have a great solution - but more on that later.

Rendering - The Sleeping Nook View
// Finishes: We have been doing our research - a lot of it. Our primary goal is to create a comfortable space - a productive and cozy extension of our home. The furnishings should be beautiful, durable, and also affordable. We typically work on this category continuously throughout the entire process. Starting with largest pieces and light fixtures - we then move to smaller pieces and decor.
Final Thoughts
Does this mean our design plan is complete? Far from it.
While we are confident in our design direction things will likely change along the way. What we do know is that we are excited to dive in and start building out this space and we are so excited to share it with you.